


9.
Configuring Target Options
This chapter discusses the Target Settings window. This window handles settings that affect a particular build target in a project.
The options in the Target Settings window are organized into a series of panels, and each panel is devoted to a particular topic. For example, one panel contains settings that specify folders to search for files listed in the Files view of a build target.
After customizing these options for a particular build target, you can create project stationery that incorporates your settings. To learn more about this topic, refer to "Creating Your Own Project Stationery" on page 61.
The topics in this chapter include:
Target Settings Guided Tour

To open the Target Settings window, choose the Edit menu. When a project file is open, the actual name of the Target Settings command includes the name of the current build target. For example, if the name of your current build target is ANSI Console Win32, then the Target Settings command becomes ANSI Console Win32 Settings.
The topics in this section are:
Settings Panels

The left side of the Target Settings window has a hierarchical list of available settings panels. The panel selected in this list appears on the right side of the window. The collection of panels varies, depending on the current build target and the CodeWarrior product you use.
To view a settings panel, select it in the list. You can use the arrow keys or click the name of the panel. Figure 9.1 shows a selected panel in the Target Settings window.
Each settings panel consists of a series of related options. These options apply to the current build target in the active project. See the following section, "Dialog Box Buttons", for more information about applying or discarding changes to the settings panels.
Figure 9.1 Selecting a settings panel

After you set all the settings for a particular build target, you can create Project stationery that incorporates your settings when creating a new project. To learn more about this topic, refer to "Creating Your Own Project Stationery" on page 61.
Dialog Box Buttons

There are several dialog box buttons in the Target Settings window that control how a panel's settings are used and applied.
The topics in this section are:
Discarding changes
If you make changes in the Target Settings window and attempt to close it, a dialog box similar to that shown in Figure 9.2 might appear. To save your changes and close the dialog box, click Save. To discard your changes and close the dialog box, click the Don't Save button. To continue using the Target Settings window without saving changes, click Cancel.
Figure 9.2 Settings Confirmation dialog box

Factory Settings button
The Factory Settings button causes the panel to revert to the settings that the CodeWarrior IDE uses as defaults. Settings in other panels are not affected by this button. Only the settings for the current panel are reset.
Revert Panel button
The Revert Panel button lets you reset the state of the current panel to its previously-saved settings. This is useful if you start making changes to a panel and then decide against your changes.
Save button
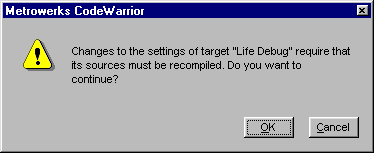
The Save button commits the current settings in all of the panels. If you change an option that requires CodeWarrior to recompile your project, the IDE displays a dialog box similar to that shown in Figure 9.3. Click OK or Cancel depending on whether you want to keep your changes.
After closing the Target Settings window, CodeWarrior handles target builds according to the settings that you saved.
Figure 9.3 Save Changes dialog box
Choosing Target Settings

This section discusses setting options for individual build targets. These options configure the IDE to suit your needs when building the targets in your project.
To learn how to open the Target Settings window and select a particular settings panel, see "Target Settings Guided Tour" on page 315.
The setting panels that appear in the Target Settings window depend on the operating system or chip family of your build target and the programming language that you use.
For example, if you are working with an x86 project, you do not see any settings panels for Motorola 68K configurations. If the C++ language is not available for a particular build target, panels related to that language do not appear.
In addition, the IDE ensures that only the files affected by a settings change are marked for recompilation. For example, changing a setting in the resource compiler causes the IDE to mark only resource compiler sources as dirty. This specific marking reduces the amount of recompilation required during the next Make operation and increases linking speed.
This manual does not discuss settings panels that are specific to a particular operating system, microprocessor family, or programming language. Table 9.1 lists the various manuals where you can learn the details of OS-, processor-, or language-specific settings panels. This list includes the most common settings panels supported in various CodeWarrior products.
While some settings panels apply to a small number of build targets, other panels are pertinent to all build targets. This section discusses these general settings panels. They are organized into the following groups:
Table 9.1 Where to learn about specific settings panels
Target Configurations

The following settings panels apply to the CodeWarrior build targets:
Target Settings
The Target Settings panel, shown in Figure 9.4, is the single most critical panel in CodeWarrior. This is the panel where you choose a target operating system and/or microprocessor for your project.
To learn how to open the Target Settings window and select the Target Settings panel, see "Target Settings Guided Tour" on page 315.
Figure 9.4 Target Settings panel
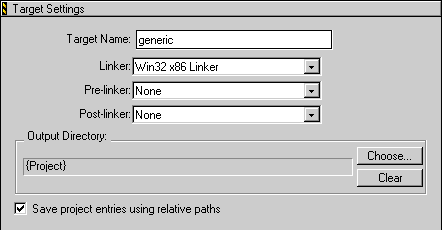
The Target Settings panel lets you set the name of the current build target and the linker plug-ins for the build target. When you select a linker, you are specifying the target operating system and/or chip. The other panels available in the Target Settings window change to reflect your choice.
Because the linker choice affects the visibility of other related settings panels, you must set your build target first before you can specify other options like compiler and linker settings.
It is possible to completely change build targets in this panel. When you change the build target, you must change the libraries contained in the project file for that build target. Choosing a new value for a build target does not change these related files for you. For this reason, you should remember to remove inappropriate libraries and add required libraries when changing the build target.
If you create a new project from stationery, the necessary library and support files are already included. You can then add source files from the old project. For more information on creating a project based on stationery, see "Creating a New Project" on page 52.
Target Name
Use the Target Name field to set or change the name of the current build target. This name appears in the Targets view in the Project window.
The name you enter in this field is not the name of your final output file. Rather, this field shows the name you assign to the build target for your personal use. The name of the final output file is typically set in the settings panel for the linker you choose for your build target.
Linker
Choose a linker from the items listed in the Linker pop-up menu.
To learn more about the choices available to you, refer to the Targeting manual for your selected build target. The choices depend on the plug-in linkers you have for your CodeWarrior product.
For example, CodeWarrior Professional provides linkers for Mac OS on 68K and PowerPC, Win32 on x86, and the Java Virtual Machine. CodeWarrior for PlayStation OS provides a linker for the PlayStation OS running on MIPS, as well as a post-linker.
 NOTE
NOTE
See "File Mappings" on page 334 for more information about the file mappings associated with the linker you choose. These file mappings determine whether the IDE recognizes files in your project.
Pre-linker
Some build targets have pre-linkers that perform additional work on the object code in your project. This work takes place before the object code is linked into the final executable file. For more information about the pre-linkers available for your build target, refer to the information in the appropriate Targeting manual.
Post-linker
Some build targets have post-linkers that perform additional work (such as format conversion) on the final executable file. For more information about the post-linkers available for your build target, refer to information in the appropriate Targeting manual.
Output Directory
This field shows the location in which the IDE places your final linked output file. The default location is the directory that contains your project file. Click the Choose button to specify a different location. Click the Clear button to remove the current location.
Save project entries using relative paths
When this checkbox is enabled, the IDE remembers the location of a project entry as a relative path from one of the access paths. This extra location information lets the IDE distinguish different source files with the same name. The IDE remembers this location even if it needs to re-search for files in the access paths.
If the checkbox is disabled, the IDE only remembers project entries by name. Re-searching for files could cause the IDE to find the project entry in a different access path.
See "Re-search for Files" on page 615 and "Reset Project Entry Paths" on page 616 for more information.
Access Paths
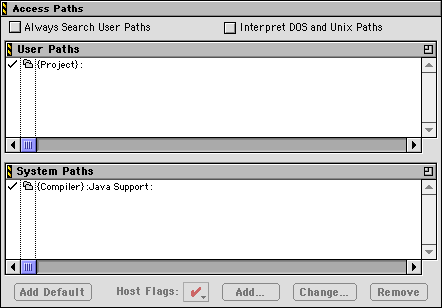
If you need to define additional access paths for the CodeWarrior IDE to search while compiling and linking your project, use the Access Paths settings panel, shown in Figure 9.5 (Windows) and Figure 9.6 (Mac OS).
To learn how to open the Target Settings window and select the Access Paths panel, see "Target Settings Guided Tour" on page 315.
If a folder icon appears beside the name of a folder in either the User Paths pane or the System Paths pane, the IDE performs a recursive search on the path. That is, the CodeWarrior IDE searches the folder and all of its subfolders.
Clicking he folder icon to the left of any path in the User Paths pane or the System Paths pane toggles recursive searching of the subdirectories in that path. If the folder icon is visible, recursive searching is enabled. If the folder icon is not visible, recursive searching is disabled.
 TIP
TIP
If you disable recursive searching of paths, and add each specific path of every directory that contains your files to either the User Paths pane or the System Paths pane, you can speed compilation of your project.
Clicking the checkmark icon to the left of any path in the User Paths pane or the System Paths pane toggles searching that path in the current CodeWarrior host computer. If the access path is checked, the current host computer searches that path. If the access path is not checked, the current host computer ignores that path.
If the files or libraries in your project are not located in the default access paths, the IDE will not find them when compiling, linking, or running your project. You must add their access paths to tell the IDE where to look.
Windows
Resource.frk files are also automatically excluded from the search list.
 TIP
TIP
You can prevent the IDE from searching a folder and all its subfolders in an access path by renaming the folder with enclosing parentheses. For example, changing the name of a folder from GameImages to (GameImages) excludes it from all subsequent searches. To add the (GameImages) folder to the search list, you must explicitly add it as an access path.
For more information about access paths, see "Interfaces pop-up menu" on page 112.
Figure 9.5 Access Paths settings panel (Windows)

User Paths (Windows)
Click this radio button to display the User Paths pane in the Access Paths preference panel.
System Paths (Windows)
Click this radio button to display the System Paths pane in the Access Paths preference panel.
Always Search User Paths
To search for system header files or interface files in the same way as user header files, enable this checkbox. If this checkbox is disabled, the IDE treats #include <> directives differently from #include "" directives.
Figure 9.6 Access Paths settings panel (Mac OS)
Interpret DOS and Unix Paths (Mac OS)
This checkbox determines how the IDE treats file names for interface files. If this checkbox is disabled, the IDE treats the backslash (\) and forward slash (/) characters as part of the file name in an interface file. If this checkbox is enabled, the IDE treats these characters as subfolder separator characters.
For example, consider the following directive:
#include "sys/socks.h"
If the Interpret DOS and Unix Paths checkbox is disabled, the IDE attempts to search for a file named "sys/socks.h" for use with the project. If the checkbox is enabled, the IDE looks for a subfolder named "sys" that has a file named "socks.h".
User Paths pane
This pane shows the access paths specific to your project. In Pascal, the IDE first searches these access paths. In C, an #include "{Project}, which is the folder that contains the current project.
System Paths pane
This pane shows the access paths for system headers and similar files. In Pascal, the IDE searches these access paths after those in the User Paths pane. In C, an #include <> directive causes the IDE to search these access paths. By default, the System Paths pane contains {Compiler}, which is the folder that contains the CodeWarrior IDE.
Add Default
The CodeWarrior IDE lets you restore the default access paths in the User Paths pane or System Paths pane after you delete them. To add the default path to the active pane, click the Add Default button. The IDE adds the default path back into the active pane. Note that this button is not available if the default access path is currently present in the active pane.
Host Flags
This pop-up menu specifies the host platform that can use an access path. To allow a host platform to use a selected access path in the User Paths pane or System Paths pane, choose the host platform from the Host Flags pop-up menu.
To allow all host platforms to use the access path, choose All from the pop-up menu. To prevent any host from using the access path, choose None from the pop-up menu.
For example, selecting a path and choosing Mac OS in the Host Flags pop-up menu specifies that the IDE must search the access path on a Mac OS computer and ignore the access path when running on any other host platform.
Add
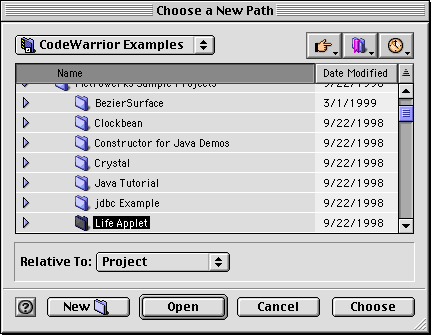
To add a new access path, first select the User Paths pane or the System Paths pane, then click the Add button. The dialog box shown in Figure 9.7 (Windows) or Figure 9.8 (Mac OS) appears. Use the dialog box controls to select the item for which you want to add an access path. You can also drag-and-drop folders onto the appropriate pane in order to add access paths.
Figure 9.7 Access Path Selection Dialog Box (Windows)

You can specify how CodeWarrior stores an access path by choosing one of the following options:
Figure 9.8 Access Path Selection Dialog Box (Mac OS)
 NOTE
NOTE
Relative paths allow projects to contain two or more files with identical names. However, for large projects, you might notice slower performance when adding relative paths to a project.
Select an access path type from the available types, and then select the folder whose access path you want to add. Click OK to add the selected item's access path to the User Paths pane or the System Paths pane, or click Cancel to discard your changes and leave the panes unchanged.
Change
To change an access path, first select the path in the User Paths pane or the System Paths pane, then click the Change button. The dialog box shown in Figure 9.7 on page 328 (Windows) or Figure 9.8 (Mac OS) appears. Use this dialog box to select a new access path to replace the original path. To learn more about the options in the dialog box, refer to "Add" on page 327.
Remove
To remove an access path, first select the path to be removed from the User Paths pane or the System Paths pane. Then, click the Remove button to delete the path from the pane.
Windows
You can also remove access paths by dragging them to the Recycle Bin on the Desktop.
Mac OS
You can also remove access paths by dragging them to the Trash on the Desktop.
Build Extras
The Build Extras panel contains various options that affect the way the IDE builds a project. These options are shown in Figure 9.9 (Windows) and Figure 9.10 on page 332 (Mac OS).
To learn how to open the Target Settings window and select the Build Extras panel, see "Target Settings Guided Tour" on page 315.
Figure 9.9 Build Extras settings panel (Windows)

Use modification date caching
This checkbox determines whether the IDE checks the modification date of each file in a project before making the project. This option is useful if you use other text editors in addition to the one provided with CodeWarrior. For example, if you modify a file with a third-party text editor, enabling the checkbox causes the IDE to mark the file for recompilation based on its modification date. If you use only the CodeWarrior editor, disable the checkbox to shorten compilation time.
Cache Subprojects
Enabling this checkbox improves multiproject updating and linking. Enabling the checkbox also allows the browser to generate symbolics information for both the build targets and the subprojects within each build target. Disabling the checkbox reduces the amount of memory required by the CodeWarrior IDE.
Activate Browser
Enable this checkbox to let the IDE generate symbolics information required by the browser the next time your project is built. Without this information, you cannot open browser windows for your project.
See "Making a Project" on page 360 for more information about rebuilding your project. To learn more about browser settings and options, see "Browsing Source Code" on page 205.
Figure 9.10 Build Extras settings panel (Mac OS)

Dump Internal Browse Information After Compile
Enable this checkbox to view the raw browser information that a plug-in compiler or linker provides for the IDE. This option is useful if you develop plug-ins for use with the IDE.
 NOTE
NOTE
When the Dump internal browse information after compile checkbox is enabled, you should only compile single files or small files. The internal browser information that the IDE displays can be huge when compiling an entire project.
Use third party debugger (Windows)
Enable this checkbox to use a third-party debugger in place of the CodeWarrior debugger. Enter the path to the third-party debugger application in the field provided, or click the Browse button to locate the debugger application using a standard Open dialog box.
Runtime Settings
The Runtime Settings panel, shown in Figure 9.11, includes options for specifying a debugging application for non-executable files, defining a working directory, listing program arguments, and creating environment variables.
Host Application for Libraries & Code Resources
This field lets you specify a host application to use when debugging a non-executable file, such as a shared library, dynamic link library (DLL), or code resource. The application you specify in this field is not a debugger application, but rather the application with which the non-executable file interacts.
Figure 9.11 Runtime Settings panel

For example, if you write a Photoshop plug-in, you would use the select Photoshop as the host application. When you use the Debug command, the IDE builds the plug-in, loads the symbolics information for the plug-in, and then launches Photoshop to let you debug the plug-in.
To specify a host application, type the path to that application directly into the field. Alternatively, click Choose to display a standard dialog box. Use the dialog box controls to select the application. Click Clear to remove the current path from the field.
General Settings
This section has the following fields:
Environment Settings
This section lets you specify environment variables that are passed to your program as part of the environment parameter in your program's main() function, or as part of environment calls. These variables are only available to the target program. When your program terminates, the settings are no longer available. For example, if you write a program that logs into a server, you could use variables for PASSWORD and USER as shown in Figure 9.11.
To create a new environment variable, follow these steps:
1. Type a name for the environment variable in the Variable field.
2. Type a value for the environment variable in the Value field.
3. Click the Add button.
The new environment variable appears in the environment list shown in Figure 9.11.
To modify an existing environment variable, follow these steps:
1. Select from the environment list the environment variable you wish to modify.
2. Change the Variable and Value fields as desired.
3. Click the Change button.
The modifications appear in the environment list shown in Figure 9.11.
To delete an existing environment variable, follow these steps:
1. Select from the environment list the environment variable you wish to delete.
2. Click the Remove button.
The selected environment variable is removed from the environment list shown in Figure 9.11.
File Mappings
The File Mappings settings panel, shown in Figure 9.12, is used to associate a file name extension such as ".c" or ".p" with a plug-in compiler. This tells the CodeWarrior IDE which compiler to use when a file with a certain name extension is encountered.
 NOTE
NOTE
These file mappings determine whether the IDE recognizes files in the project. If you have trouble adding files to your project, or if the IDE refuses a folder or file that you drag and drop into the Project window, check the File Mappings settings panel. Because the file mappings are associated with the current linker, these mappings change as you select different linkers. For more information, see "Linker" on page 322.
Figure 9.12 File Mappings settings panel

To learn how to open the Target Settings window and select the File Mappings Panel, see "Target Settings Guided Tour" on page 315.
File Mappings list
The File Mappings list contains a File Type, associated Extension, and compiler choice for each file-name extension in the list. This list determines which compiler the IDE invokes when a given file name is encountered.
To add a new extension to this list, choose an existing entry in the list, edit the information in the Mapping Info section as desired and click the Add button.
For example, to add a documentation file mapping to the current project, you would follow these steps:
1. Choose an existing file mapping.
2. Delete the text in the File Type field.
3. Change the text in the Extension field to ".doc" (without the quotes).
4. Choose None from the Compiler pop-up menu.
5. Click the Add button.
File Type
Enter in this field the file type for the selected file mapping in the File Mappings list.
Extension
This flag lets you enter a file name extension, such as the ".c" or ".h" extensions, for a selected File Type in the File Mappings list. Table 9.2 shows the default file name extensions used by the CodeWarrior IDE.
Table 9.2 Default file name extensions
Compiler
This pop-up menu lets you choose a compiler for the selected File Type in the File Mappings list.
Flags
This pop-up menu lets you enable and disable four options:
Resource File
Enabling this flag causes the IDE to include in your finished product the resources from files with the selected file mapping.
Launchable
Enabling this flag causes the IDE to open the source-code file with the application that created it when you double-click the file in the Project window.
Precompiled
Enabling this flag causes the IDE to compile files with the selected file mapping before compiling other files. This flag is useful if the original files create documents that other source files or compilers use. For example, this option lets you create a compiler that translates a file into a C source-code file and then compiles the C file. YACC (Yet Another Compiler Compiler) files are treated as precompiled files because YACC generates C source code to be compiled by a C compiler.
Ignored by Make
Enabling this flag causes the IDE to ignore files with the selected file mapping when compiling or linking the project. This flag is useful if the files contain comments or documentation that you want to include with your project.
Source Trees
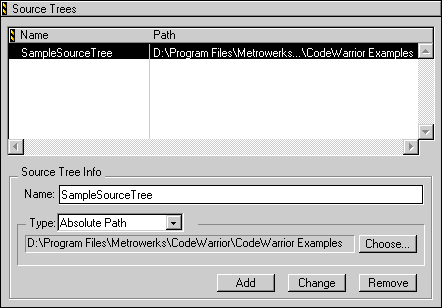
The Source Trees settings panel, shown in Figure 9.13, lets you define project-specific source trees (root paths) for use in your projects. You can define your project's access paths and build-target output in terms of source trees. Using this approach, you can easily share projects across various hosts. You need only make minor changes to the source trees' paths to maintain your project's functionality.
There is also a Source Trees preference panel that applies globally to the IDE. For more information about this settings panel, see "Source Trees" on page 261. The source trees defined in the Target Settings window can only be used with the current build target in the active project. The source trees you define in the IDE Preferences window can be used for all projects. If you define the same source trees in both panels, the target-specific source trees take precedence over the global source trees.
Figure 9.13 Source Trees settings panel
Source Trees list
This list shows all of the project's source trees. The list consists of two columns:
Name
This field is part of the Source Tree Info section shown in Figure 9.13. Use the Name field to enter a name for a new source tree or to change the name of an existing source tree.
Type
This field is part of the Source Tree Info section shown in Figure 9.13. Use the Type field to choose one of the following types of source trees:
Add
To add a new source tree, first select the appropriate type of source tree from the Type pop-up menu. Next, enter a name for the new source tree in the Name field.
When you create an Absolute Path source tree, the Choose button is available. Click this button to select a path using a standard dialog box, as shown in Figure 9.14 (Windows) and Figure 9.15 (Mac OS).
On the Windows-hosted IDE, you can specify how CodeWarrior stores a path by choosing one of these path type options:
Figure 9.14 Access Path Selection dialog box (Windows)

Figure 9.15 Access Path Selection dialog box (Mac OS)

 NOTE
NOTE
Relative paths allow projects to contain two or more files with identical names. However, for large projects, you might notice slower performance when adding relative paths to a project.
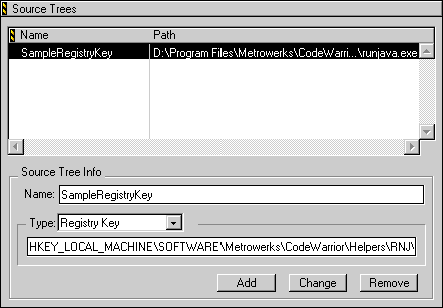
When you create an Environment Variable or Registry Key source tree, the Type field changes to the field shown in Figure 9.16. Enter the path to the environment variable or registry key in this field.
Figure 9.16 Creating a registry key (Windows)
When you finish adding source trees, click the Save button in the IDE Preferences window to save your changes. The source trees are then displayed in the path pop-up menus for your project. For example, if you create a source tree named Sample, you can use it to create an access path, as shown in Figure 9.17. You can also define your project's target output in terms of the source trees by using the Output Directory field in the Target Settings panel. For more information about this settings panel, refer to "Target Settings" on page 321.
Change
To change a source tree, first select it in the Source Trees list. Next, modify the Name and Type fields as desired. Then click the Change button. When you finish modifying the source trees, click the Save button in the IDE Preferences window to save your changes.
 NOTE
NOTE
After changing a source tree, you might need to modify your project so that you do not refer to the source tree in its original form. Therefore, the IDE displays a message reminding you to update your project.
Figure 9.17 Choosing source trees in access path pop-up menus

If your project's files or libraries are not in the source trees, the IDE will not find them when compiling, linking, or running your project. Therefore, after you change an existing source tree, the IDE displays a message reminding you to update your project.
Remove
To remove a source tree, first select it in the Source Trees panel. Then, click the Remove button, and the source tree is removed. When you finish removing source trees, click the Save button in the IDE Preferences window to save your changes.
 NOTE
NOTE
After removing a source tree, you might need to modify your project so that you do not refer to the removed source tree. Therefore, the IDE displays a message reminding you to update your project.
Code Generation Configurations

The following panels customize the way the IDE generates code:
Global Optimizations
The Global Optimizations panel, shown in Figure 9.18, is available when for many build targets. Use this panel to configure how the compiler rearranges its object code to produce smaller and faster-executing object code. Some optimizations remove redundant operations in a program, while other optimizations analyze an item's use in a program. The goal of these optimizations is to improve your program's performance.
Figure 9.18 Global Optimizations settings panel

To learn how to open the Target Settings window and select the Global Optimizations panel, see "Target Settings Guided Tour" on page 315.
All optimizations rearrange object code without affecting the object code's logical sequence of execution. In other words, an unoptimized program and its optimized counterpart produce the same results.
 NOTE
NOTE
Use compiler optimizations only after you finish debugging your program. Using a debugger on a program that has been optimized might affect the debugger's ability to view source code.
To find specific information on how these settings apply to a build target, see "Targeting Documentation" on page 27.
Optimize For
Use these options to configure how the CodeWarrior IDE optimizes your code:
Faster Execution Speed
This option improves the execution speed of object code. Object code is faster, but can be larger.
Smaller Code Size
This option reduces the size of object code produced by the compiler. Object code is smaller, but can be slower.
Optimization Level Slider
Use the slider to determine the optimizations that are applied to your code. You can choose to disable code optimizations entirely, or you can choose to apply one of four levels of optimizations. The higher the level you select, the more optimizations the IDE applies to your code.
Details
The Details field, below the Optimization Level Slider, lists the optimizations applied to the project. The following list describes each of the optimizations:
-
Global Register Allocation-Working values of heavily used variables are stored in registers instead of memory. This option also appears as Global Register Allocation Only for Temporary Values when you set the Optimization Level Slider to "Optimizations Off."
-
Dead Code Elimination-Removes statements that, logically, can never be executed or are never referred to by other statements. With this option enabled, object code is smaller.
-
Branch Optimizations-The optimizer merges and restructures portions of the intermediate code translation. These optimizations eliminate some branch instructions. With this option enabled, the object-code size is reduced and the execution speed improves.
-
Arithmetic Optimizations-Computationally intensive instructions are replaced with faster equivalent instructions that produce the same result. For example, a multiply instruction can replace several add instructions. Also, several multiply instructions can replace a library call for raising a variable to a specified power. These optimizations result in faster object code.
-
Expression Simplification-These optimizations find equivalent and simplified arithmetic expressions. For example,
a replaces 1*a, a+b replaces a-(-b), x&y replaces x&(x&y), and x replaces x&(x|y).
-
Common Subexpression Elimination-Replaces similar redundant expressions with a single expression. For example, if two consecutive statements both use the expression
a*b*c+10, the compiler generates object code that computes the expression only once and applies the resulting value to both statements. With this option enabled, object code is smaller and faster.
-
Copy Propagation-Replaces multiple occurrences of one variable with a single occurrence. With this option enabled, object code is smaller and faster. This option also appears as Copy and Expression Propagation for some build targets.
-
Peephole Optimization-Applies local optimizations to small sections of your code. With this option enabled, the optimized sections of code are faster.
-
Dead Store Elimination-Removes assignments to a variable if the variable is not used before being reassigned again. With this option enabled, object code is smaller and faster.
-
Live Range Splitting-This optimization handles a local variables that is used in two completely separate contexts in a program. For example, note the two disjoint uses of the variable
i in Listing 9.1. The second use of the variable i can be replaced by a different compiler temporary variable. Live range splitting reduces the liftetimes of variables so that they can be optimally allocated. Long live ranges cause unnecessary spilling in registers.
Listing 9.1 Live Range Splitting example
int a[100], b[100], c[100], d[100], e[100], f[100];
foo(int n)
{
int i;
for(i=0; i<n; i++)
{
a[i] = b[i] + c[i];
}
for(i=0; i<n; i++)
{
d[i] = e[i] + f[i]
}
}
Linker Configurations

The following panels apply to general linking in CodeWarrior:
FTP PostLinker
The FTP PostLinker settings panel, shown in Figure 9.19, lets you upload a file to a remote computer using File Transfer Protocol (FTP). You can also configure transfer options and log generation.
To learn how to open the Target Settings window and select the FTP PostLinker panel, see "Target Settings Guided Tour" on page 315.
Host Address
Enter in this field the Internet address of the remote computer.
User Name
Enter in this field the user name you use to log in to the remote computer.
Password
Enter in this field the password you use to log in to the remote computer. For security, the actual password is hidden from view.
Figure 9.19 FTP PostLinker settings panel
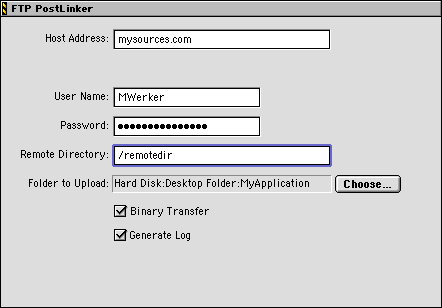
Remote Directory
Enter in this field the directory you wish to access on the remote computer. Note that you must have access privileges for the directory specified in this field.
Folder to Upload
Click the Choose button next to this field to open a standard dialog box. Use the dialog box controls to select the folder that contains the files you wish to upload to the remote computer.
Binary Transfer
Enable this checkbox to transfer files to the remote computer via binary transfer. Disable the checkbox to transfer files via ASCII text.
Generate Log
Enable this checkbox to generate a log file of the transfer. Disable the checkbox if you do not wish to generate a log file.
Editor Configurations

The following panels apply to the CodeWarrior Editor:
Custom Keywords
The Custom Keywords settings panel, shown in Figure 9.20, lets you define your own keyword sets to associate with certain colors when they appear in your editor files. These keywords are project-specific, not global to the CodeWarrior IDE.
To learn how to open the Target Settings window and select the Custom Keywords panel, see "Target Settings Guided Tour" on page 315.
Figure 9.20 Custom Keywords settings panel

For information on defining keyword sets, see "Syntax Coloring" on page 274. That topic also discusses the details of setting colors, specifying keywords, and importing and exporting keywords.
To change the color for a keyword set, click its associated color sample. To change the contents of a keyword set, click the Edit button to display a dialog box. Change the entries in the dialog box as desired.
Debugger Configurations

The following panels apply to the CodeWarrior debugger:
Debugger Settings
The Debugger Settings panel, shown in Figure 9.21, includes options to log activities, change data-update intervals, and set other related options.
To learn how to open the Target Settings window and select the Debugger Settings panel, see "Target Settings Guided Tour" on page 315.
Figure 9.21 Debugger Settings panel

Log System Messages
Enable this checkbox to log all system messages to a file. If you do not wish to create a log file, disable the checkbox. For more information about viewing log files, see "Log Window" on page 415.
 NOTE
NOTE
In Windows, log information includes messages about the loading and unloading of DLLs, as well as debug printf() messages. In the Mac OS, log information refers to messages about the loading of PowerPC code fragments, as well as DebugStr() messages.
Location of Relocated Libraries, Code Resources or Remote Debugging Folder
Use this field to specify the location of the relocated libraries, code resources, or other non-executable files required by the current project. You can also use the field to specify the remote debugging folder used by the project. Enter the path directly into the field. Alternatively, click Choose to display a standard dialog box. Use the dialog box controls to select the required files.
Data Update Interval
Enable this checkbox to update the information in debugging windows according to a specified time interval. Enter an interval in the Every x Seconds field, where x represents the number of seconds you wish to elapse before the next update. If you do not wish to update the debugging information, disable the checkbox. In this case, the information in debugging windows stays the same throughout the debugging session.
Auto-target Libraries
This checkbox applies to the current project when you use the debugger to debug a file that is not a project file. For example, this situation can occur when you attach a running process. For more information about attaching processes, see "Processes window toolbar" on page 425
Enable the Auto Target Libraries checkbox to let the IDE attempt to debug dynamically linked libraries (DLLs) that are loaded by the target application. The IDE attempts to automatically debug the loaded DLLs for which symbolics information is available.
 NOTE
NOTE
You might notice slower performance when you enable the Auto Target Libraries checkbox. If you encounter this problem, try disabling the checkbox to improve the IDE's performance.
Stop at Watchpoints
Enable this checkbox to halt a program's execution when the debugger encounters a watchpoint, regardless of whether the watched value changes. Disable this checkbox to halt execution only when the watched value changes.


Visit the Metrowerks website at: http://www.metrowerks.com
For assistance contact Metrowerks Technical Support at: support@metrowerks.com
Copyright © 1999, Metrowerks Corp. All rights reserved.
Last updated: May 24, 1999


 NOTE
NOTE
 TIP
TIP
 TIP
TIP


 NOTE
NOTE


 NOTE
NOTE

 NOTE
NOTE


 NOTE
NOTE

 NOTE
NOTE

 NOTE
NOTE

 NOTE
NOTE


 NOTE
NOTE
 NOTE
NOTE


